-
몬스터의 상태 구현과 애니메이션 작업 과정 입니다.
public enum MonsterState
{
    Idle, Walk, AttackReading, Attack
}

public MonsterState monsterState = MonsterState.Walk;
현재 몬스터의 상태는 대기, 걷기, 공격대기중, 공격 으로 총 4가지 상태가 있으며 초기 상태는 걷기 상태 입니다.
switch (monsterState)
{
    case MonsterState.Idle:
        monsterAnimator.SetTrigger("Idle");
        if (player.position.x < transform.position.x)
        {
            Vector3 localScale = transform.localScale;
            localScale.x = -1;
            transform.localScale = localScale;
        }
        else
        {
            Vector3 localScale = transform.localScale;
            localScale.x = 1;
            transform.localScale = localScale;
        }

        timerStart = true;

        break;
    case MonsterState.Walk:
        monsterAnimator.SetTrigger("Walk");

        float targetX = startingPosition.x + distance * direction;

        monsterRigidbdy2D.velocity = new Vector2(speed * direction, monsterRigidbdy2D.velocity.y);

        if (direction == 1 && monsterRigidbdy2D.position.x >= targetX)
        {
            transform.localScale = new Vector2(-1, 1);
            direction = -1;
        }
        else if (direction == -1 && monsterRigidbdy2D.position.x <= startingPosition.x - distance)
        {

            transform.localScale = new Vector2(1, 1);
            direction = 1;
        }
        break;
    case MonsterState.AttackReading:
        elapsedTime += Time.deltaTime;

        float t = Mathf.Clamp01(elapsedTime / duration);
        transform.localScale = Vector3.Lerp(Vector3.one, new Vector3(2, 2, 2), t);

        if (elapsedTime >= duration)
        {
            elapsedTime = 0.0f;
            monsterState = MonsterState.Attack;
        }
        break;
    case MonsterState.Attack:
        break;
}
상태 구현은 Swith문 에서 각 상태에 맞게 동작을 구현해 주었습니다.
하나씩 살펴 보겠습니다.
case MonsterState.Walk:
    monsterAnimator.SetTrigger("Walk");

    float targetX = startingPosition.x + distance * direction;

    monsterRigidbdy2D.velocity = new Vector2(speed * direction, monsterRigidbdy2D.velocity.y);

    if (direction == 1 && monsterRigidbdy2D.position.x >= targetX)
    {
        transform.localScale = new Vector2(-1, 1);
        direction = -1;
    }
    else if (direction == -1 && monsterRigidbdy2D.position.x <= startingPosition.x - distance)
    {

        transform.localScale = new Vector2(1, 1);
        direction = 1;
    }
    break;
먼저 상태가 Walk일 시 실행되는 case 입니다.
초기 상태에 Walk 애니메이션을 실행 시켜주었으며 speed를 설정해 rigidbody2d의 velocity를 이용해 이동 구현을 해주었습니다.
최대 이동 거리는 Distance 로 3.0f 거리 이며 최대 및 최소 이동 거리에 도달 했을시 반대 방향으로 이동 합니다.
public void BeDamaged(float damage, Vector2 dir, float force)
{
    if (monsterState != MonsterState.AttackReading)
    {
        monsterState = MonsterState.Idle;

        monster_Hp -= damage;
        monsterRigidbdy2D.AddForce(dir * -force * recoilFactor);
    }
}
피격을 받을때 실행되는 BeDamaged 함수에서 피격을 받을 시 잠시 몬스터의 상태가 Idle로 되게 해주었습니다.
case MonsterState.Idle:
    monsterAnimator.SetTrigger("Idle");
    if (player.position.x < transform.position.x)
    {
        Vector3 localScale = transform.localScale;
        localScale.x = -1;
        transform.localScale = localScale;
    }
    else
    {
        Vector3 localScale = transform.localScale;
        localScale.x = 1;
        transform.localScale = localScale;
    }

    timerStart = true;

    break;
몬스터의 상태가 Idle 일 시 Idle 파라미터의 조건을 가진 애니메이션을 실행 시켜줍니다.
다음 플레이어를 받아와 로컬 스케일 x를 이용하여 플레이어를 바라보게 해주었습니다.
마지막 bool 변수인 timerStart가 true가 되면
if (monsterState == MonsterState.Idle && timerStart == true)
{
    readytimer += Time.deltaTime;
    while (readytimer > readytime)
    {
        monsterState = MonsterState.AttackReading;
        readytimer = 0;
        timerStart = false;
    }

}
타이머가 실행 됩니다.
현재 설정한 값은 10초로 타이머에 도달할 때까지 잠시 대기시간을 갖게 되며 몬스터의 상태는 AttackReading 상태가 됩니다.
case MonsterState.AttackReading:
    elapsedTime += Time.deltaTime;

    float t = Mathf.Clamp01(elapsedTime / duration);
    transform.localScale = Vector3.Lerp(Vector3.one, new Vector3(2, 2, 2), t);

    if (elapsedTime >= duration)
    {
        elapsedTime = 0.0f;
        monsterState = MonsterState.Attack;
    }
    break;
이 후 마지막으로 몬스터의 로컬 스케일이 (1, 1, 1) 에서 (2, 2, 2)로 증가하는 로직을 구현해 주었으며
아래 조건문을 보시면 타이머를 이용하여 elapsedTime이 duration(2.0f) 값 보다 크다면 더이상 스케일을 증가시키지 않고 몬스터는 Attack 상태가 됩니다.
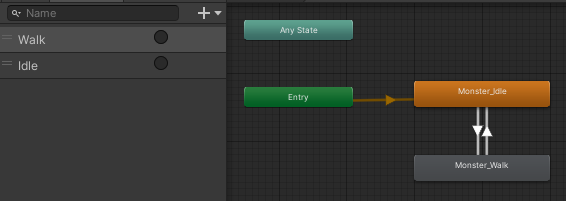
현재 몬스터의 애니메이터 창 입니다.
코드에서 Settrigger를 보면 알 수 있듯이, 전이 되는 조건을 트리거로 설정해 주었습니다.
비하인드 스토리..
readytimer += Time.deltaTime; 과 같이 타이머를 설정해 주는곳 에서
readytimer + Time.deltaTime; 로 설정하여 엉뚱한 곳을 수정하는 일이 발생했었습니다.
무언가 잘 안되거나 오류가 발생할땐 무턱대고 유추하여 수정하지 말고, 차근차근 하나씩 살펴 봅시다..
'연습 프로젝트 > 2D로그라이크 게임' 카테고리의 다른 글
UI 정보 패널 & 미니맵 (0) 2024.06.08 UI 기획 (1차) (0) 2024.06.08 몬스터 상태 구현 (Update) (0) 2024.06.08 플레이어 공격 (0) 2024.06.07 플레이어 이동 로직 (0) 2024.06.06